ESD Bench Mats for Electronics Manufacturing and PCB Assembly
Professional 2-Layer Rubber ESD Bench Mats for Static-Controlled Workstations
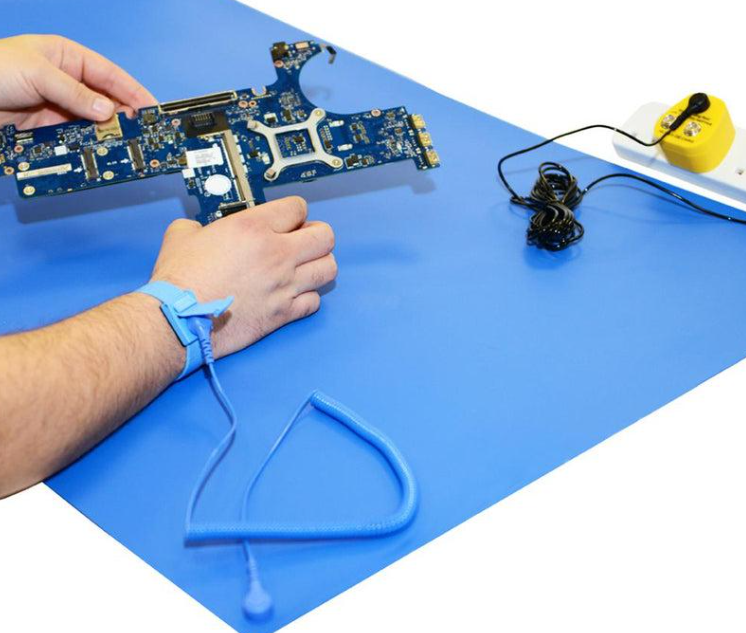
An ESD bench mat provides a controlled static-dissipative work surface for handling printed circuit boards, semiconductors, electronic assemblies and other electrostatic discharge sensitive devices.
Unlike an ordinary rubber sheet or desk pad, a professional ESD bench mat is engineered to control the movement of electrostatic charge. When correctly connected to a verified grounding system, the mat helps drain accumulated charge at a controlled rate rather than allowing an uncontrolled discharge through a sensitive electronic component.
ESDBEST manufactures 2-layer rubber ESD bench mats for PCB assembly, SMT production, electronics repair, quality inspection, laboratories, semiconductor processing and other electrostatic protected areas.
Our mats are available as standard sheets, custom-cut workbench mats and full rolls, with optional grounding cords, common point ground connections, custom colors, logo printing and OEM packaging.
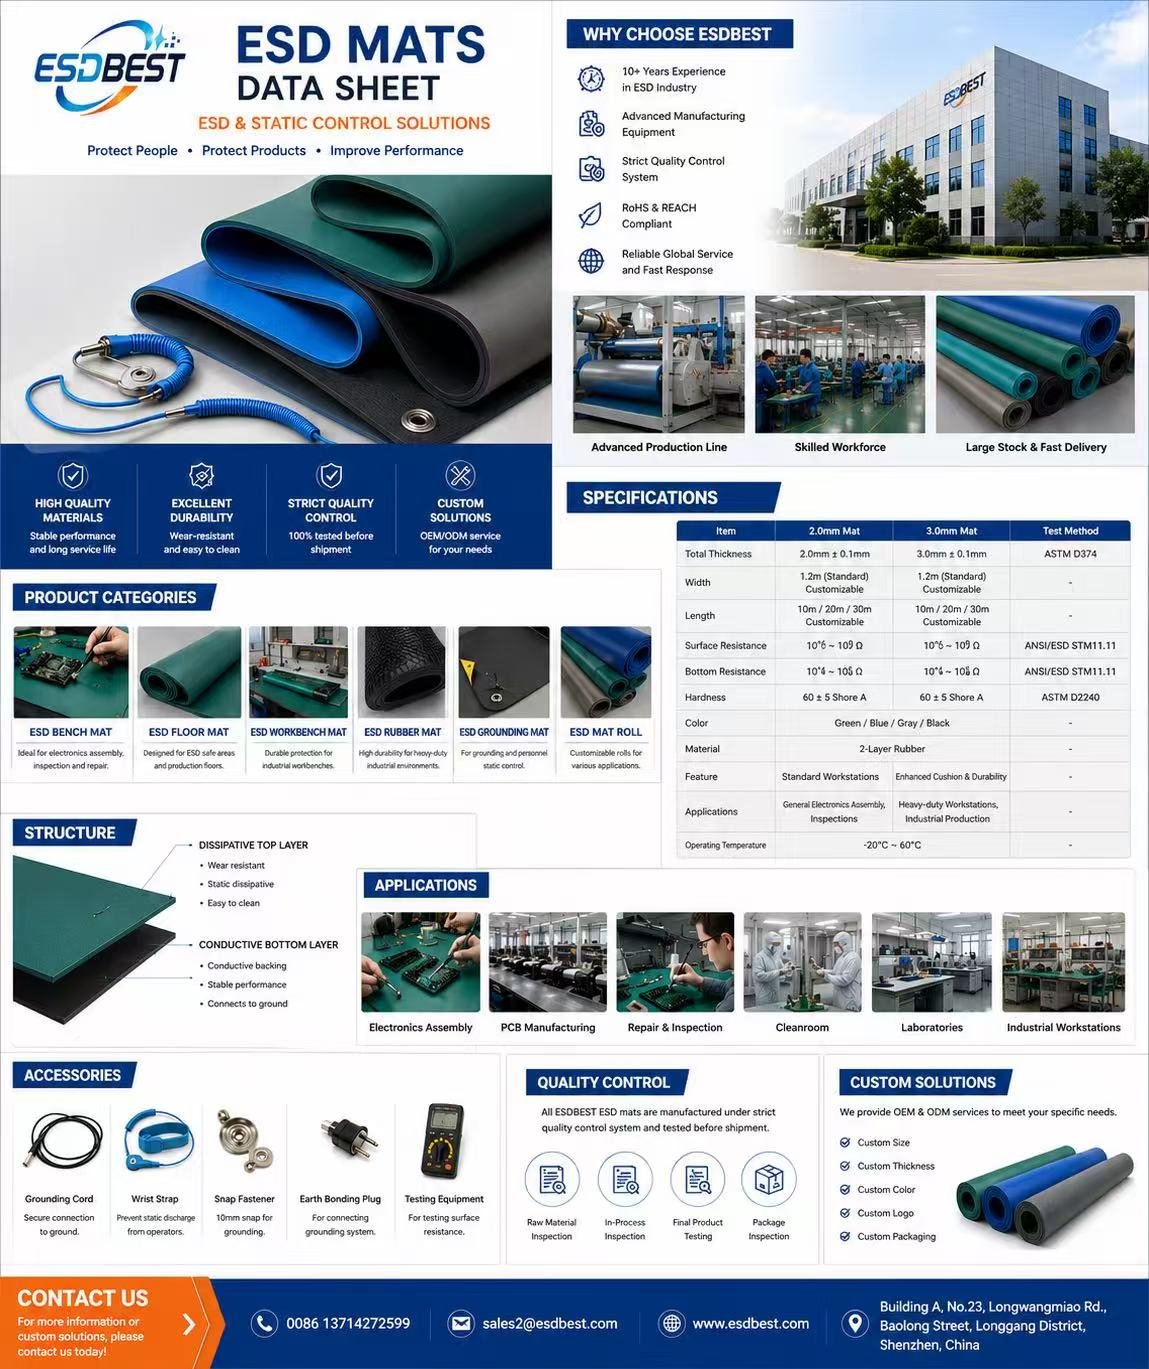

ESD Bench Mat Specifications
Product Name | ESD Bench Mat |
Color | green/black/grey/blue, etc |
Material | Rubber |
Thickness | 2mm |
Size | 0.6m*10m, 1m*10m, 1.2m*10m or custom-made |
Usage | anti-static workbench mat |
Surface | Matte/Smooth |
Packing | carton/roll |
Weight | 30kg/roll |
Keywords | ESD table mat/ESD rubber mat |

Why Choose ESDBEST?
- 29+ years of ESD product manufacturing experience
- 2-layer rubber ESD mat construction
- Standard sheets, rolls and custom-cut sizes
- OEM colors, logos and private-label packaging
- Resistance testing and batch inspection
- Complete workstation grounding accessories
- Worldwide B2B supply
- Factory-direct technical support
Find the Right ESD Bench Mat
Standard Bench Mats
Pre-cut rubber mats for electronics assembly, repair benches, laboratories and inspection stations.
ESD Mat Rolls
Continuous rolls for production lines, long workbenches and custom installation projects.
Custom-Cut Mats
Cut to the required bench length, width, thickness and grounding-point position.
Complete Grounding Kits
Available with mat grounding cord, common point ground connection and wrist strap connection.
OEM ESD Mats
Custom colors, packaging, surface finish, logos, labels and product specifications for distributors and industrial buyers.
What Is an ESD Bench Mat?
An ESD bench mat is an electrically controlled work surface used to protect electrostatic discharge sensitive components during assembly, inspection, testing, repair and packaging.
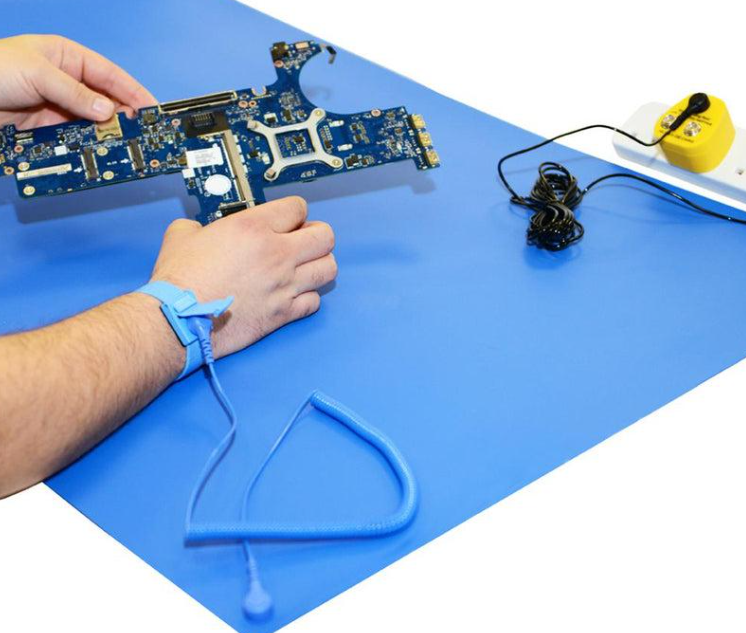
The mat is normally installed on top of an electronics workbench and connected to a designated grounding point. When an electrically charged object contacts the mat, the accumulated charge is directed through the mat and grounding system at a controlled rate.
This controlled dissipation helps reduce the risk of a sudden electrostatic discharge passing through a printed circuit board, integrated circuit, semiconductor device or electronic assembly.
An ESD bench mat is commonly used as part of an Electrostatic Protected Area, often called an EPA. However, the mat is only one part of a complete ESD control system.
A properly configured workstation may also include:
- A common point ground
- A verified protective earth connection
- A wrist strap and wrist strap cord
- ESD-safe tools
- ESD chairs
- Static-control garments
- ESD storage containers
- Ionization equipment
- Approved packaging materials
- Periodic resistance and continuity testing
The performance of the complete system depends on correct product selection, installation, grounding, maintenance and compliance verification.
ESD Bench Mat vs Ordinary Rubber Mat
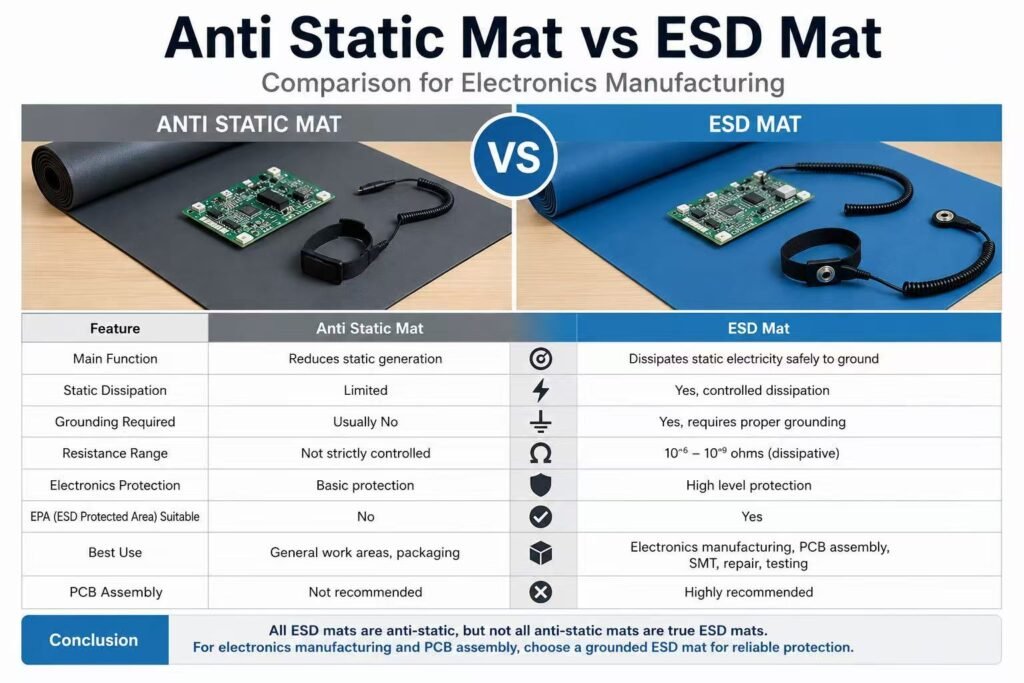
An ordinary rubber mat may provide cushioning, heat resistance or slip resistance, but these characteristics do not make it suitable for handling ESD-sensitive devices.
Its electrical resistance may be too high, too low or inconsistent across the surface. It may also lack a designated grounding point and a verified path to ground.
An ESD bench mat, by comparison, is manufactured to provide controlled electrical performance and is designed to be integrated into an ESD grounding system.
A mat should therefore not be selected only because it is described as rubber, anti-slip, insulated or anti-static. Buyers should examine the measured electrical properties, test method, grounding design, material construction and intended application.
Why PCB Assembly Workstations Need ESD Bench Mats
Printed circuit boards can contain components that are vulnerable to electrostatic discharge at voltages that may not be felt or seen by the operator.
A person can therefore handle a PCB without noticing any spark while an ESD event affects a sensitive component.
Possible outcomes include:
- Immediate component failure
- Intermittent malfunction
- Reduced device reliability
- Latent damage
- Lower production yield
- Increased rework
- Field returns
- Difficult fault diagnosis
An ESD bench mat creates a defined work surface where loose components, circuit boards, tools and assemblies can remain within a controlled grounding environment.
It does not eliminate every ESD risk by itself, but it provides an essential foundation for a properly managed workstation.
How Does an ESD Bench Mat Work?
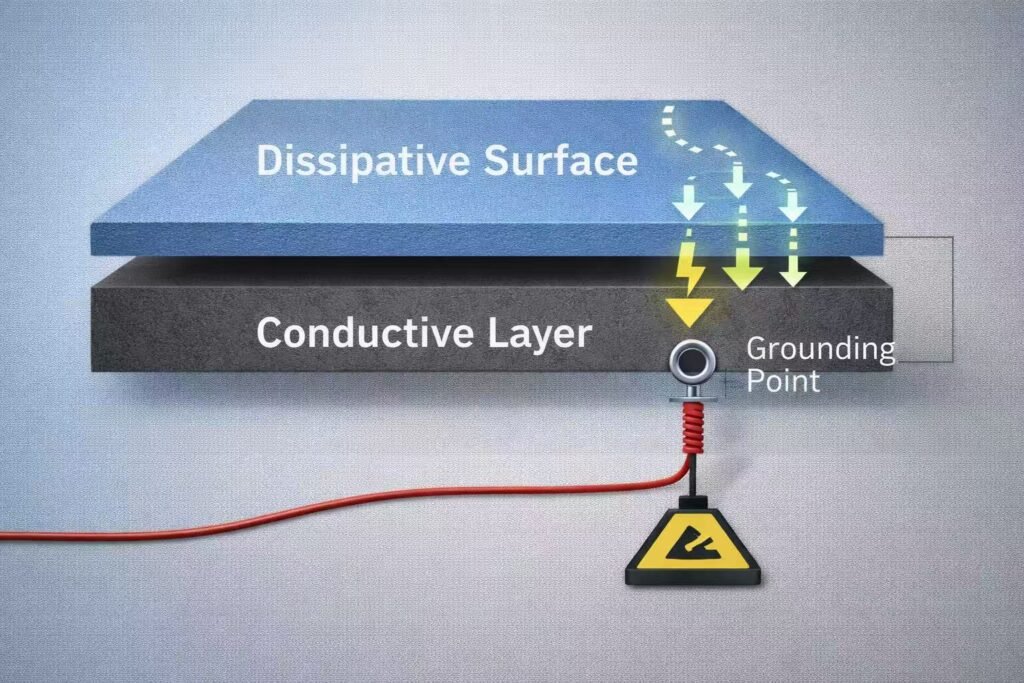
An ESD workbench mat works by creating a controlled electrical path between charged objects on the work surface and the facility grounding system.
The process can be understood in four stages.
1. Charge Is Generated
Electrostatic charge can be generated when materials contact, separate, slide or rub against each other.
Common examples include:
- An operator walking across a floor
- Removing adhesive tape
- Sliding a plastic tray
- Handling plastic packaging
- Moving a chair
- Removing protective film
- Separating component reels
- Wearing synthetic clothing
2. Charge Reaches the Work Surface
Charge may be carried by personnel, tools, packaging, components or production materials.
When these items contact a properly installed ESD bench mat, the mat provides a controlled interface rather than an electrically unpredictable surface.
3. The Top Layer Controls Dissipation
The static-dissipative top layer helps limit rapid charge movement.
This is important because a surface that is excessively conductive may allow charge to move too quickly, while a highly resistive surface may not provide an effective discharge path.
The objective is controlled charge dissipation—not simply the lowest possible resistance.
4. The Bottom Layer Carries Charge Toward Ground
In a 2-layer rubber mat, the more conductive lower layer helps distribute the electrical path across the mat and toward the grounding snap.
The mat is then connected through an approved grounding cord to a common point ground and a verified earth-grounding system.
The exact grounding arrangement should follow the facility’s ESD control plan and applicable safety requirements.
ESDBEST 2-Layer Rubber ESD Bench Mat Construction
ESDBEST supplies 2-layer rubber ESD bench mats designed for industrial electronics workstations.
Static-Dissipative Top Layer
The upper layer forms the working surface.
Its functions include:
- Supporting controlled charge dissipation
- Protecting electronic components
- Providing a smooth and stable work surface
- Resisting normal production wear
- Reducing glare with an optional matte finish
- Supporting soldering and assembly applications
- Allowing routine cleaning
Conductive Bottom Layer
The lower layer helps provide a more consistent electrical path toward the grounding connection.
Its functions include:
- Distributing charge across the underside
- Supporting point-to-ground performance
- Improving grounding consistency
- Connecting the work surface to the grounding snap
- Supporting stable electrical behavior across larger mat sizes
Why Use a Two-Layer Mat?
A two-layer construction combines a controlled working surface with a lower-resistance grounding layer.
The top layer is intended to interact with products and tools, while the lower layer supports a consistent path to the groundable point.
This construction is particularly suitable for:
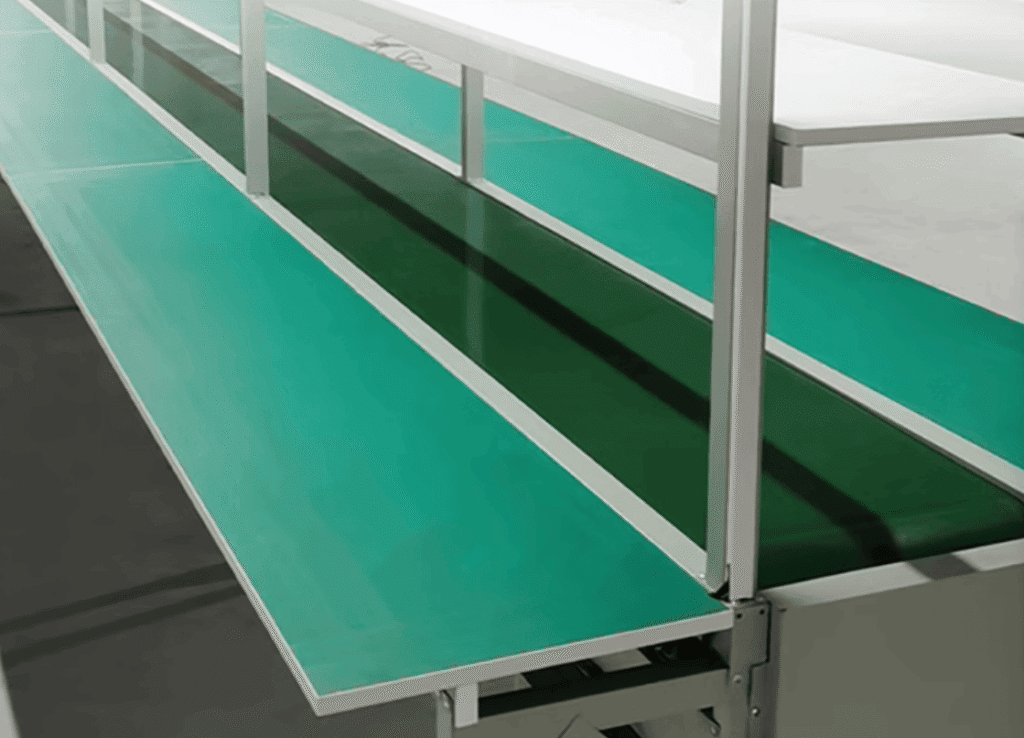
- PCB assembly lines
- SMT workstations
- Electronics repair benches
- Semiconductor handling
- Quality-control stations
- Soldering stations
- Laboratory benches
- Component inspection areas
- Electronic product packaging stations
Optional Grounding Components
A complete mat system may include:
- 10 mm grounding snap
- Mat grounding cord
- Common point ground
- Wrist strap connection
- Grounding plug or terminal
- Grounding block
- Warning label
- Installation instructions
- Ionizer
The grounding accessory configuration should be confirmed according to the electrical system and safety requirements of the destination country.
ESD Bench Mat Technical Specifications
The exact specification should be confirmed through the relevant ESDBEST datasheet and batch test report.
Product Type
2-layer rubber ESD bench mat
Recommended Applications
- PCB assembly
- SMT production
- Electronics repair
- Electronic component handling
- Semiconductor processing
- Testing and inspection
- Laboratory work
- Soldering stations
- Quality-control workstations
Available Forms
- Pre-cut sheets
- Custom-cut mats
- Full rolls
- Workstation grounding kits
Common Thicknesses
- 2 mm
- 3 mm
Available Surface Finishes
- Smooth
- Matte
- Anti-glare
- Textured options upon request
Common Colors
- Green
- Blue
- Gray
- Black
- Custom OEM colors
Optional Customization
- Custom length and width
- Logo printing
- Custom packaging
- Grounding snap position
- Surface texture
- Product labels
- Distributor branding
- Private-label cartons
- Complete grounding kits
Important Specification Note
Do not publish a single universal resistance value unless it matches the actual ESDBEST product test data.
The product page, technical datasheet, quotation and test report should use the same tested resistance ranges. Inconsistent values across different documents can reduce buyer confidence and create technical disputes.
ESD Bench Mat Resistance Explained
Electrical resistance is one of the most important factors when selecting an ESD bench mat.
However, resistance should not be treated as a single marketing number.
Several measurements may be relevant.
Resistance Point to Point
Resistance point to point evaluates the electrical resistance between two locations on the mat surface.
It helps assess:
- Surface consistency
- Material uniformity
- Electrical performance across the work area
- Possible contamination or wear
- Differences between production batches
Resistance to Ground
Resistance to ground evaluates the resistance between the mat surface and its groundable point or grounding system.
It helps determine whether the work surface has an effective path toward ground.
For work surfaces where unprotected ESD-sensitive items are handled, guidance associated with ANSI/ESD S20.20 generally uses an upper resistance-to-ground limit below (1 × 10^9) ohms. Product qualification and compliance verification must still follow the applicable standard, approved test method and facility ESD control plan.
Surface Resistance vs System Performance
A mat may show an acceptable material resistance but still perform poorly after installation.
Possible causes include:
- Incorrect grounding cord
- Damaged snap
- Unverified earth connection
- Dirty surface
- Insulating cleaner residue
- Loose grounding terminal
- Incorrect test voltage
- Improper electrode placement
- Excessively low humidity
- Damaged mat layers
For this reason, buyers should evaluate both product qualification data and in-use workstation performance.
Is Lower Resistance Always Better?
No.
An ESD work surface should provide controlled charge dissipation. Extremely low resistance is not automatically better for every application.
The correct choice depends on:
- Device sensitivity
- Workstation design
- Facility grounding arrangement
- Applicable ESD program
- Customer specification
- Required test method
- Charge-device-model concerns
- Product qualification limits
The objective is predictable, controlled and verifiable performance.
Conductive vs Static-Dissipative Bench Mats
The words conductive and static dissipative describe different electrical behavior.
Conductive Material
A conductive material allows charge to move relatively easily.
Conductive layers are often used beneath the working surface to help distribute charge toward a groundable point.
Static-Dissipative Material
A static-dissipative material allows charge to move in a more controlled manner.
It is commonly used as the top working layer because it helps reduce abrupt discharge while still supporting charge removal.
Which Is Better for the Top Surface?
For many electronics workstations, a static-dissipative top surface combined with a conductive lower layer provides a practical balance.
The operator and electronic product interact with the upper layer, while the lower layer supports the grounding path.
However, the final selection should be based on measured product performance and the facility’s ESD control requirements—not only on the words “conductive” or “dissipative.”
Common Selection Mistake
A buyer may choose the mat with the lowest advertised resistance because it appears to provide faster grounding.
This approach can be misleading.
A professional comparison should examine:
- Resistance point to point
- Resistance to ground
- Charge decay
- Layer construction
- Heat resistance
- Chemical resistance
- Surface durability
- Test conditions
- Grounding components
- Application requirements
Read our complete comparison:
Conductive vs Static-Dissipative ESD Mats
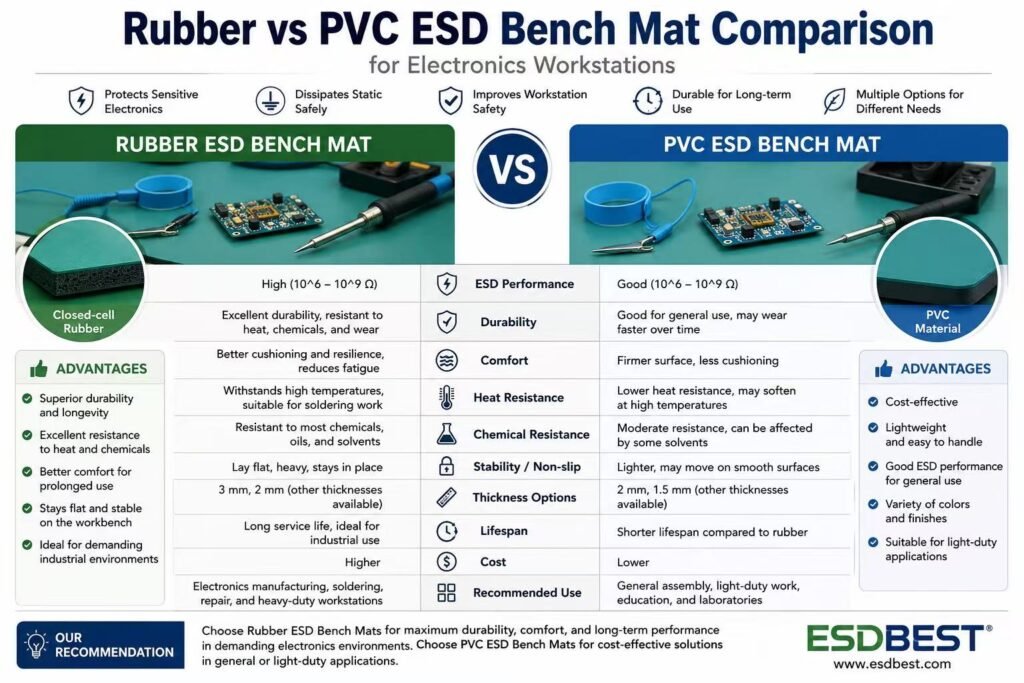
Rubber vs PVC ESD Bench Mats
Both rubber and PVC can be used for static-control work surfaces, but their practical characteristics are different.
Rubber ESD Bench Mats
Rubber mats are often selected for industrial electronics environments that require durability, heat resistance and long-term workstation use.
Potential advantages include:
- Better resistance to soldering-related heat
- Good surface durability
- Flexible installation
- Strong resistance to normal industrial wear
- Suitable for PCB and SMT workstations
- Available in multi-layer constructions
- Professional surface appearance
- Lower glare with matte finishes
PVC ESD Bench Mats
PVC mats may be suitable for lighter-duty workstations and budget-sensitive projects.
Potential advantages include:
- Lower initial cost
- Broad color availability
- Easy cutting
- Suitable for general assembly areas
- Lightweight handling
Which Material Should You Choose?
Choose rubber when the workstation involves:
- Frequent soldering
- Long production shifts
- Heavy component handling
- Repeated cleaning
- Industrial manufacturing
- Higher durability requirements
PVC may be sufficient for:
- Light assembly
- Training rooms
- Temporary installations
- Low-wear workstations
- Budget-controlled environments
Material selection should still be supported by electrical test data rather than by material name alone.
How to Ground an ESD Bench Mat
An ESD bench mat must be connected to an approved grounding system before it can provide its intended electrostatic-control function.
Do not connect the mat to an unverified metal object, water pipe, machine frame or improvised wire.
Components Required
- ESD bench mat
- Grounding snap
- Approved mat grounding cord
- Common point ground
- Verified protective earth connection
- Resistance meter or ESD tester
- Appropriate electrodes
- Workstation inspection record
Step 1: Inspect the Workbench
Make sure the bench surface is:
- Clean
- Dry
- Stable
- Free from sharp objects
- Free from oils and adhesive residue
- Large enough to support the mat without excessive folding
Step 2: Position the Mat
Place the mat flat on the workbench.
Avoid:
- Deep folds
- Rolled edges
- Trapped metal debris
- Sharp screws
- Heavy objects directly on the grounding snap
- Areas where cables may pull against the snap
Step 3: Install or Locate the Grounding Snap
Use the mat’s designated groundable point.
The snap should make reliable electrical contact with the relevant mat layer.
Do not install multiple random holes unless required by the workstation design.
Step 4: Connect the Mat Grounding Cord
Attach the grounding cord securely to the mat snap.
Check that:
- The connection is tight
- The cord is not damaged
- The resistor configuration matches the approved system
- The cord is not stretched
- The cable route does not create a trip hazard
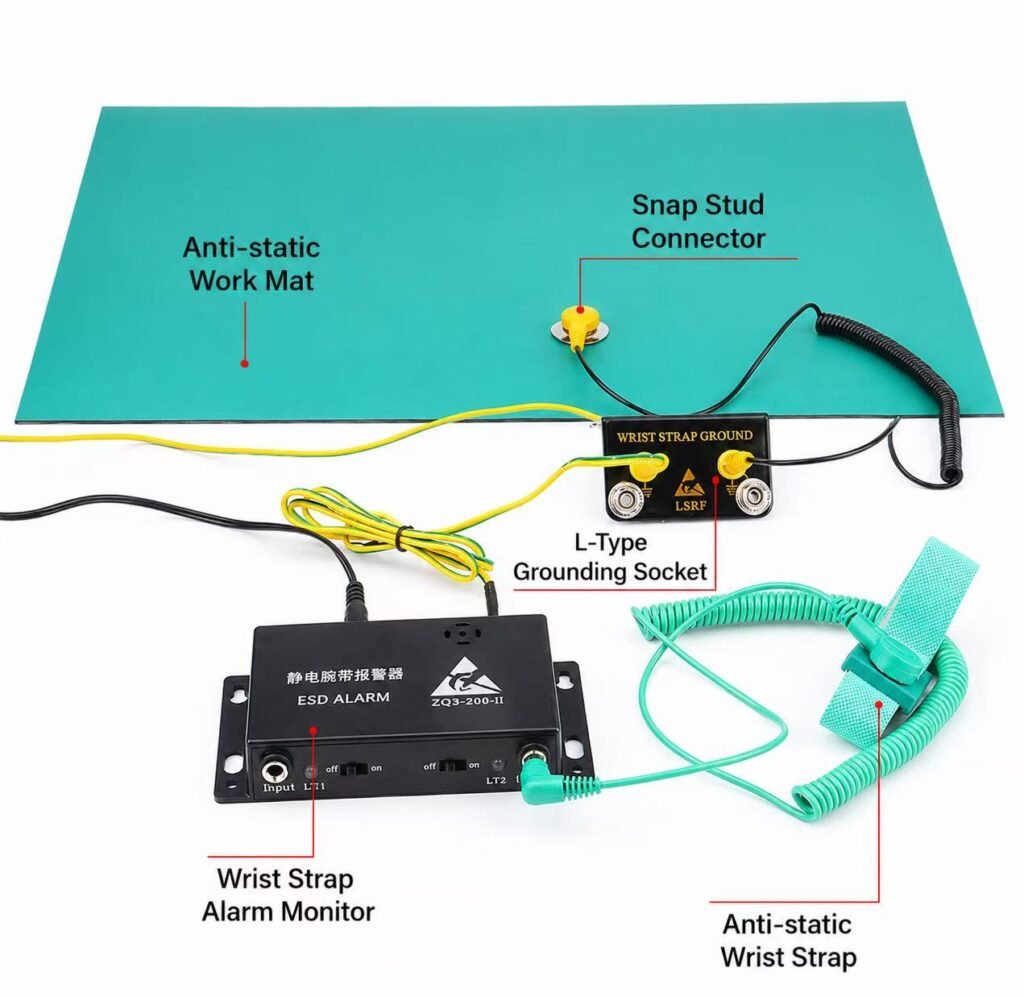
Step 5: Connect to the Common Point Ground
Connect the mat grounding cord to the workstation’s common point ground.
The common point ground may also provide a designated connection for the operator’s wrist strap.
The mat and wrist strap should be integrated according to the facility’s approved grounding design.
Step 6: Connect the Common Point to Verified Ground
The common point ground must ultimately connect to a verified grounding reference in accordance with the facility’s electrical and ESD-control requirements.
Only qualified personnel should verify or modify facility electrical grounding.
Step 7: Test the Installed System
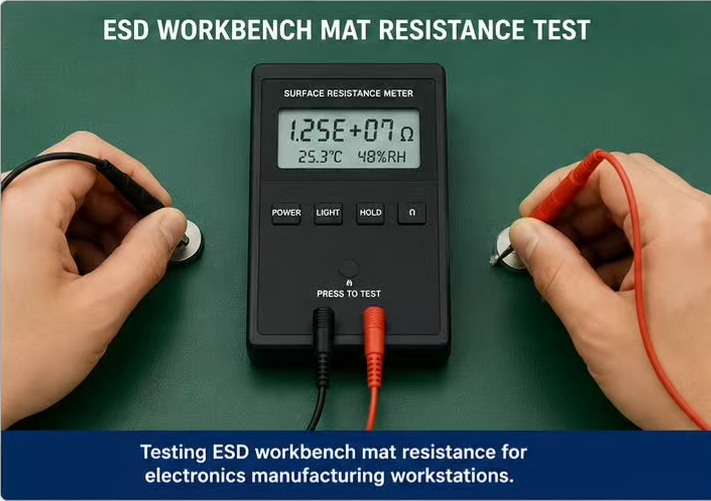
After installation, measure resistance from the work surface to the groundable point or grounding reference using the approved procedure.
Record:
- Date
- Workstation number
- Mat identification
- Instrument
- Test voltage
- Humidity
- Temperature
- Measured value
- Pass or fail result
- Technician
Step 8: Add the Workstation to the Compliance Schedule
A mat should not be tested only on the installation date.
Include it in the company’s routine compliance-verification program.
For the complete installation procedure, read:
How to Ground an ESD Mat
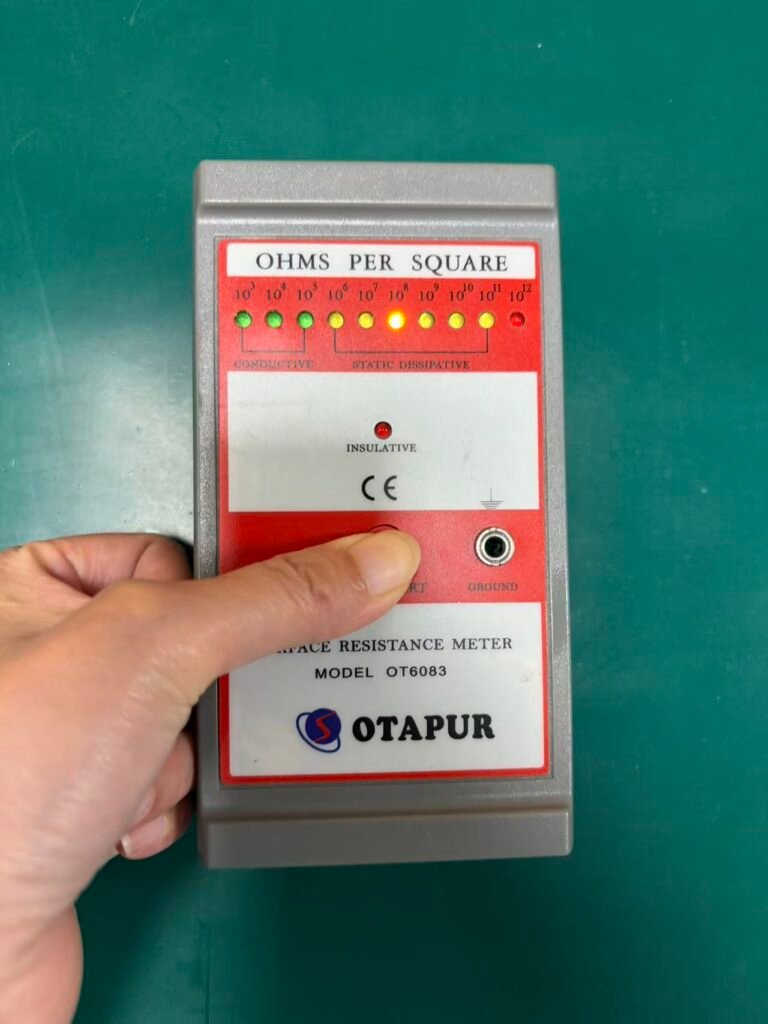
How to Test an ESD Bench Mat
Testing verifies whether the mat and installed grounding path continue to perform as intended.
Recommended Measurements
Depending on the facility program, testing may include:
- Resistance point to point
- Resistance to ground
- Ground-cord continuity
- Common-point-ground continuity
- Workstation system resistance
- Visual inspection
- Surface condition
- Grounding snap condition
Equipment
Testing may require:
- Surface resistance meter
- Resistance-to-ground tester
- Two weighted electrodes
- Test lead
- Verified grounding reference
- Temperature and humidity meter
- Cleaning materials approved for ESD surfaces
- Compliance-verification record
Basic Test Procedure
- Remove loose products and tools from the test area.
- Inspect the mat for cuts, burns and contamination.
- Clean the surface using an approved ESD-safe cleaner.
- Allow the mat to dry.
- Condition the product when required by the test plan.
- Place the electrodes according to the selected test method.
- Select the correct test voltage.
- Allow the reading to stabilize.
- Record the value and environmental conditions.
- Compare the result with the approved limit.
- Investigate any failed result before returning the station to service.
Why Environmental Conditions Matter
Relative humidity and temperature can influence resistance readings, especially on materials whose electrical behavior changes with moisture.
Always record the environmental conditions so that measurements can be compared accurately over time.
Common Causes of Failed Tests
- Damaged grounding cord
- Loose snap
- Disconnected common point ground
- Contamination
- Cleaner residue
- Paint or corrosion on a grounding terminal
- Incorrect meter settings
- Incorrect electrode spacing
- Excessive wear
- Internal delamination
- Improvised grounding
For a full testing procedure, read:
ESD Bench Mats for PCB Assembly
PCB assembly is one of the most common applications for ESD bench mats.
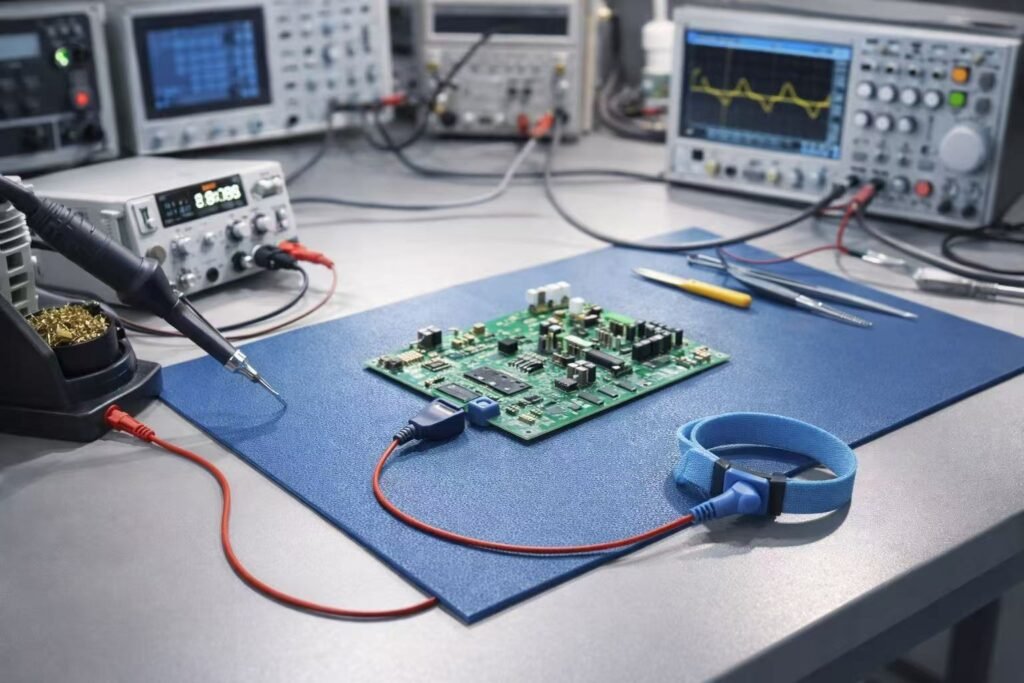
A typical PCB workstation may include:
- ESD rubber bench mat
- Wrist strap
- Common point ground
- ESD-safe soldering iron
- Ionizer
- ESD component trays
- ESD chairs
- Static-control garments
- Grounded tools
- Approved packaging
Incoming Inspection
An ESD bench mat provides a controlled surface for inspecting:
- Bare PCBs
- Integrated circuits
- Connectors
- Sensors
- Modules
- Component reels
- Electronic assemblies
Manual Assembly
During manual assembly, the mat supports controlled handling of boards and components as operators insert, position or connect parts.
Soldering and Rework
Rubber ESD mats are frequently chosen for soldering and rework areas because they provide a durable surface and improved resistance to short-duration heat exposure compared with many general-purpose plastic mats.
However, a mat should not be used as a direct holder for very hot soldering tools unless the product is specifically designed for that purpose.
Functional Testing
Testing stations may include powered equipment, cables, fixtures and circuit boards.
The workstation must therefore combine ESD control with electrical safety.
Grounding arrangements should be approved by qualified personnel and should not be improvised.
Final Inspection and Packaging
After assembly, finished boards should remain within the approved ESD-control system until they are placed into suitable protective packaging.
An ESD bench mat helps preserve the controlled environment during inspection, labeling and packing.
ESD Bench Mat Applications
SMT Production
Used at feeder preparation, inspection, repair, quality-control and offline assembly stations.
Semiconductor Manufacturing
Used for handling sensitive integrated circuits, wafers, modules and microelectronic components.
Electronics Repair
Used in service centers repairing computers, phones, industrial controls, instruments and communication equipment.
Automotive Electronics
Used for control modules, sensors, battery-management systems, displays and electronic subassemblies.
Medical Electronics
Used for manufacturing and servicing monitoring equipment, diagnostic devices and electronic instruments.
Aerospace and Defense Electronics
Used in controlled work areas where product traceability and process verification are critical.
Telecommunications
Used for circuit boards, communication modules, networking devices and optical electronic assemblies.
Laboratories
Used in research, engineering, testing and product-development environments.
Educational Training
Used in electronics laboratories where students handle sensitive devices and circuit boards.
ESD Bench Mat vs ESD Floor Mat
Bench mats and floor mats serve different functions.
ESD Bench Mat
Primary function:
Protecting electronic devices and assemblies on the work surface.
Typical installation:
On top of a workbench or production table.
Common connections:
Mat grounding cord and common point ground.
Typical users:
PCB assembly operators, technicians, inspectors and engineers.
ESD Floor Mat
Primary function:
Supporting personnel grounding and static control in standing or walking areas.
Typical installation:
On the floor near a workstation or production area.
Common connections:
Floor mat grounding system, typically used with approved ESD footwear or heel grounders.
Typical users:
Standing operators and mobile personnel.
Do You Need Both?
Some workstations benefit from both a grounded bench mat and an ESD floor system.
The correct combination depends on:
- Operator movement
- Wrist strap usage
- Standing or seated work
- Product sensitivity
- Facility flooring
- Footwear program
- Workstation layout
- Compliance requirements
Read the complete comparison:
ESD Bench Mat Sizes and Thicknesses
The correct mat size should cover the active handling area without interfering with equipment, cable management or workstation safety.
Common Pre-Cut Sizes
- 600 × 900 mm
- 600 × 1200 mm
- 700 × 1200 mm
- 900 × 1200 mm
- Custom workstation sizes
Common Roll Sizes
- 1 m × 10 m
- 1.2 m × 10 m
- Custom roll widths and lengths
Confirm actual production availability before publishing fixed dimensions.
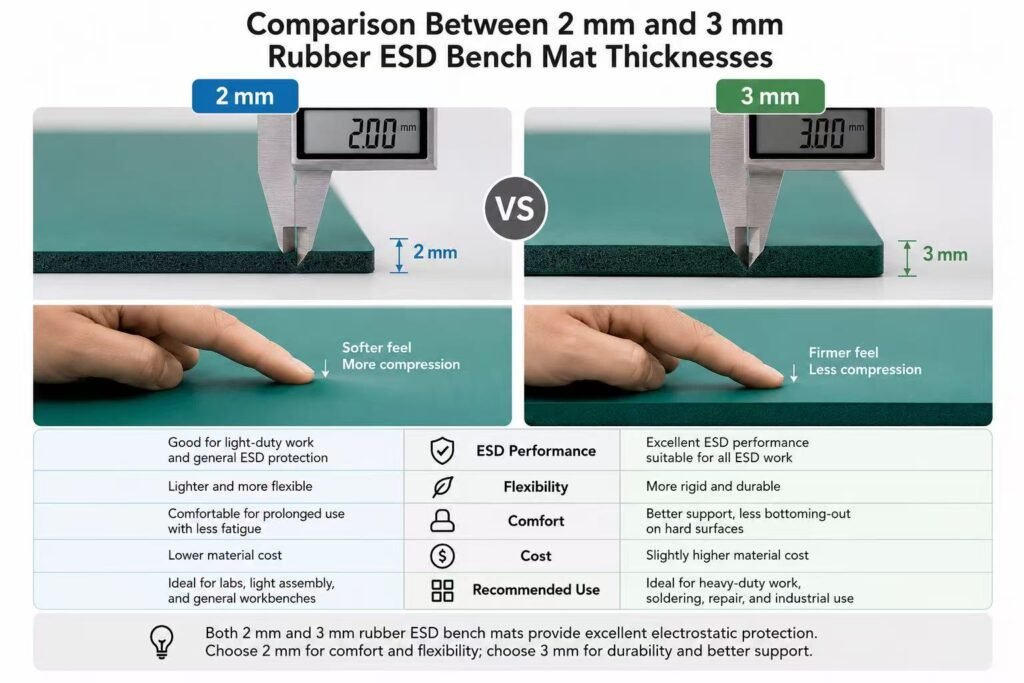
2 mm vs 3 mm
2 mm ESD Bench Mat
Suitable for:
- General electronics assembly
- PCB inspection
- Light workstations
- Cost-sensitive projects
- Large roll installations
Advantages:
- Lighter weight
- Easier cutting
- Lower material cost
- Suitable for most standard workbench applications
3 mm ESD Bench Mat
Suitable for:
- Heavy-duty workstations
- Frequent tool use
- Long operating shifts
- Higher cushioning requirements
- Premium workstation projects
Advantages:
- Greater physical durability
- More cushioning
- Stronger premium appearance
- Better suitability for intensive use
Thickness alone does not determine ESD performance. Resistance, grounding, layer quality and test results remain essential.
How to Choose the Right ESD Bench Mat
1. Define the Application
Identify whether the mat will be used for:
- PCB assembly
- Soldering
- Repair
- Inspection
- Testing
- Packaging
- Laboratory work
- Semiconductor handling
2. Confirm the Required Electrical Limits
Review:
- Customer specification
- ESD control plan
- Product qualification requirement
- Resistance-to-ground limit
- Resistance point-to-point limit
- Test method
- Device sensitivity
3. Select the Material
Choose rubber for demanding industrial electronics applications requiring durability and heat resistance.
Consider PVC for lighter-duty or temporary applications.
4. Select the Construction
A 2-layer mat is generally preferred when a controlled working surface and consistent conductive lower layer are required.
5. Select the Size
Measure the actual active work area.
Allow space for:
- PCB handling
- Tools
- Fixtures
- Inspection equipment
- Grounding connections
Avoid covering emergency switches, ventilation openings or safety markings.
6. Select the Thickness
Choose 2 mm for standard applications and 3 mm for heavier-duty or premium workstations.
7. Confirm the Grounding Accessories
Specify:
- Grounding snap size
- Snap position
- Cord type
- Connector type
- Common point ground
- Wrist strap connection
- Destination-country plug or terminal
8. Request Test Documents
Ask the supplier for:
- Technical datasheet
- Product resistance data
- Batch inspection report
- Material information
- Installation guide
- Cleaning instructions
- Product sample
9. Test the Sample in Your Facility
Before a large order, verify the product under your actual:
- Temperature
- Humidity
- Cleaning procedure
- Grounding system
- Workstation design
- Production conditions
10. Evaluate the Total Cost
Do not compare only the price per square meter.
Consider:
- Service life
- Replacement frequency
- Installation cost
- Grounding accessories
- Cutting waste
- Testing requirements
- Packaging
- International freight
- Customization
- Supplier quality control
Common ESD Bench Mat Mistakes
Using the Mat Without Grounding
An ungrounded mat may not provide the intended charge-dissipation path.
Connecting to an Unverified Metal Object
A table leg or machine frame is not automatically a verified ground.
Using Household Cleaner
Some cleaners leave insulating residue that changes surface resistance.
Placing Plastic Sheets on the Mat
Plastic covers, ordinary tape and packaging can introduce insulating or charge-generating materials.
Ignoring the Grounding Cord
A damaged cord can cause the entire workstation to fail even when the mat itself remains in good condition.
Never Retesting the Installation
A mat can become contaminated, damaged or disconnected over time.
Selecting Only by Color
Green, blue, gray or black does not indicate electrical performance.
Trusting an “Anti-Static” Label Without Data
Ask for measurable resistance specifications, test methods and product documentation.
Using the Mat as Electrical Insulation
An ESD bench mat is not automatically an electrical-insulation mat.
ESD control and electrical shock protection are different safety functions.
Cleaning and Maintenance
Routine cleaning helps maintain both appearance and electrical performance.
Recommended Cleaning Procedure
- Remove components and tools.
- Disconnect the workstation if required by the approved procedure.
- Remove loose dust.
- Apply an approved ESD-surface cleaner.
- Wipe with a clean, low-lint cloth.
- Allow the mat to dry completely.
- Inspect the grounding cord and snap.
- Retest when required.
Avoid
- Wax
- Silicone polish
- Household furniture cleaner
- Oil-based cleaner
- Abrasive powder
- Strong solvent
- Metal scraper
- Unapproved adhesive remover
When Should a Mat Be Replaced?
Consider replacement when the mat shows:
- Deep cuts
- Severe burns
- Cracking
- Permanent curling
- Delamination
- Exposed lower layer
- Damaged grounding point
- Repeated resistance-test failure
- Chemical degradation
- Surface contamination that cannot be removed
Replacement should be based on inspection and measured performance rather than age alone.
Custom ESD Bench Mats and OEM Manufacturing
ESDBEST provides customization for electronics manufacturers, industrial distributors and private-label brands.
Custom Dimensions
We can produce:
- Custom-cut sheets
- Long workstation mats
- Production-line rolls
- Special widths
- Special lengths
- Pre-cut workstation kits
Custom Colors
Color options may include:
- Green
- Blue
- Gray
- Black
- Customer-specified colors
Color matching is subject to minimum order quantity and technical feasibility.
Logo Printing
Available options may include:
- Company logo
- ESD warning symbol
- Product model
- Grounding instructions
- Distributor brand
- Private-label identification
Custom Packaging
Options may include:
- Individual cartons
- Export cartons
- Roll packaging
- Product labels
- Barcode labels
- Installation instructions
- Distributor packaging
Grounding Configuration
The grounding snap position and accessory set can be adjusted to match the workstation design.
Send us:
- Workbench dimensions
- Required mat thickness
- Color
- Quantity
- Resistance specification
- Grounding method
- Packaging requirements
- Destination country
Our team will recommend the suitable configuration.
ESDBEST Manufacturing and Quality Control
The performance of an ESD bench mat depends on raw materials, layer consistency, production control and electrical testing.
A typical production process may include:
- Raw-material preparation
- Rubber mixing
- Material conditioning
- Calendering
- Layer bonding
- Vulcanization
- Surface finishing
- Thickness inspection
- Resistance testing
- Cutting
- Grounding-snap installation
- Logo printing
- Final inspection
- Packaging
- Shipment
Quality-Control Checks
Depending on the product and order, inspections may include:
- Surface appearance
- Width and length
- Thickness
- Color
- Layer bonding
- Resistance point to point
- Resistance to groundable point
- Grounding-snap installation
- Roll quality
- Packaging
- Quantity
- Label information
Customers can request product samples and order-specific documentation before bulk production.
Watch:
- How to Ground an ESD Bench Mat
- ACL 800 ESD Mat Resistance Test
- Conductive vs Static-Dissipative Mat Test
- 2 mm vs 3 mm ESD Mat Comparison
- ESD Bench Mat Factory Production
- Complete ESD Workstation Setup
- What Happens When an ESD Mat Is Not Grounded?
Download Center
ESD Bench Mat Videos
How to Ground an ESD Bench Mat
Build a Complete ESD Workstation
A professional ESD bench mat works best as part of a complete static-control system.
Recommended products include:
- ESD bench mat
- Mat grounding cord
- Common point ground
- ESD wrist strap
- ESD chair
- ESD gloves
- ESD shoes
- ESD storage bins
- Ionizer
- ESD workbench
Request an ESD Bench Mat Quote
Need a standard ESD bench mat, custom-cut sheet, complete roll or OEM solution?
Send ESDBEST the following information:
- Required size
- Thickness
- Color
- Quantity
- Resistance requirement
- Grounding accessories
- Logo requirements
- Packaging requirements
- Destination country
Our team will recommend a suitable 2-layer rubber ESD bench mat for your workstation and provide a factory quotation.
Request a Free Sample
Download the Technical Datasheet
Get a Factory Quote
Email: sales2@esdbest.com
Phone / WhatsApp: +86 137 1427 2599
Need ESD Bench Mats for Your Factory?
Contact ESDBEST for bulk supply, custom sizes and static control solutions.
Email: sales2@esdbest.com
WhatsApp: +86 13714272599
Related ESD Resources
Recommended internal links:
📞 Contact Us Today
For bulk orders, quotes, or product guidance, get in touch with our expert team:
Email: sales2@esdbest.com
Phone & Whatsapp : +86 137 1427 2599
Upgrade Your Workstation with a Professional ESD Bench Mat Protect your electronics from invisible static damage.
👉 Get factory pricing for bulk orders
👉 Customize your ESD bench mat today
Email: sales2@esdbest.com
Whatsapp: +86 137 1427 2599