Complete Setup Guide for Electronics Assembly
How to Build an ESD Workstation (Step-by-Step Guide)
Electrostatic discharge can silently damage sensitive electronics long before the damage becomes visible. In electronics manufacturing, PCB assembly, testing, repair, semiconductor handling, and lab work, even a small static charge can reduce product reliability or cause immediate component failure.
That is why a properly designed ESD workstation is essential.
An ESD workstation is not just a desk with an anti-static mat. It is a complete static-control setup designed to keep operators, tools, work surfaces, and sensitive components at the proper electrical potential. A good setup reduces ESD risk, improves quality control, and supports safer electronics handling.
If you are asking how to build an ESD workstation, this guide explains the process step by step. You will learn what equipment is needed, how each part works, how to ground the workstation correctly, and how to choose the right setup for electronics manufacturing, repair benches, and industrial assembly environments.
In this guide, you will learn:
-
what an ESD workstation is
-
why ESD workstations matter
-
what equipment is needed
-
how to ground the workstation
-
how to set up mats, wrist straps, and seating
-
when to use ionizers
-
how to maintain an ESD-safe work area
What You Need
✅ Essential Components:
• ESD mat
• Common ground point
🔧 Step-by-Step Setup Step
Step1: Install ESD mat Step
Step2: Connect grounding
Step 3: Wear wrist strap Step
Step4: Test system
🧠 Advanced Protection
• Ionizers
• ESD shoes
💥 Why It Matters
• Reduce failures
• Improve quality
• Prevent losses
What Is an ESD Workstation?
An ESD workstation is a static-controlled work area designed to protect sensitive electronic components from electrostatic discharge. It typically includes an ESD mat, wrist strap, grounding point, and other ESD-safe equipment that help safely dissipate static electricity during electronics assembly, repair, or testing.
Why You Need an ESD Workstation
A person can generate static electricity simply by walking, sitting, moving clothing, handling plastic packaging, or working in low humidity. That charge may not be felt, but it can still damage:
-
printed circuit boards
-
integrated circuits
-
sensors
-
connectors
-
semiconductor devices
-
telecom components
-
medical electronics
-
industrial control boards
There are two main kinds of ESD damage:
Catastrophic Damage
The component fails immediately and no longer works.
Latent Damage
The component appears to work, but its reliability is weakened. It may fail later in the field, creating more expensive quality problems.
A proper ESD workstation setup helps reduce both risks by controlling static electricity at the point of handling.
What Do You Need for an ESD Workstation?
To build an ESD workstation, you typically need an ESD table mat, grounding cord, wrist strap, common point ground, ESD-safe chair, proper storage, and sometimes an ionizer. The exact setup depends on whether the workstation is used for electronics assembly, repair, testing, or cleanroom work.
What Is Included in an ESD Workstation?
A complete workstation usually includes several coordinated parts rather than a single product.
Typical ESD workstation equipment includes:
-
grounding cord
-
common point ground
-
ESD-safe tools and bins
-
shelving or storage for ESD-sensitive parts
-
ESD flooring or floor mat if required
-
heel grounders or ESD shoes in some environments
-
ionizing fan when insulators are present
The exact combination depends on the work being performed.
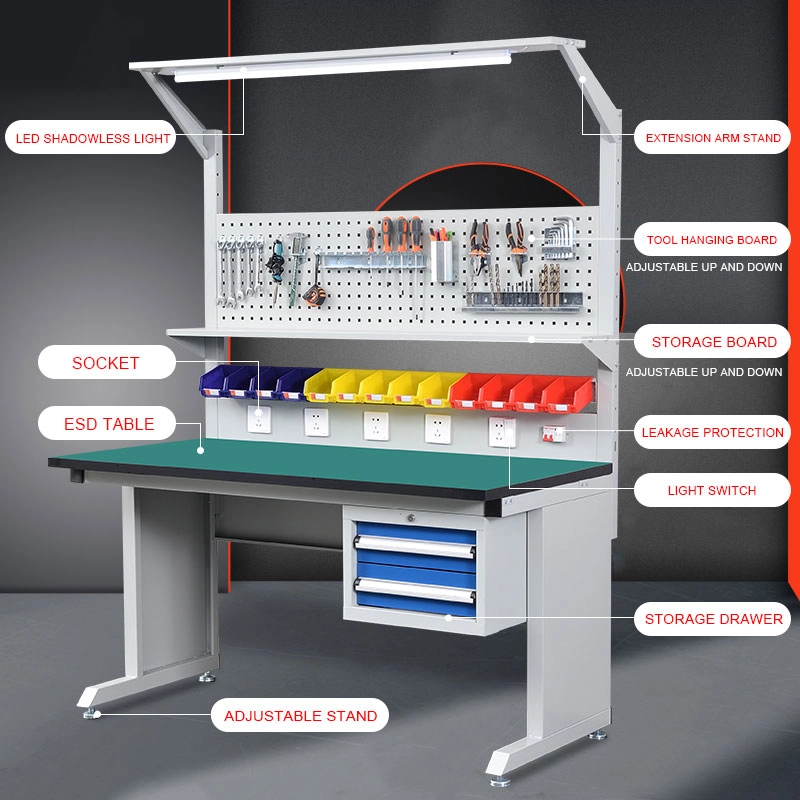
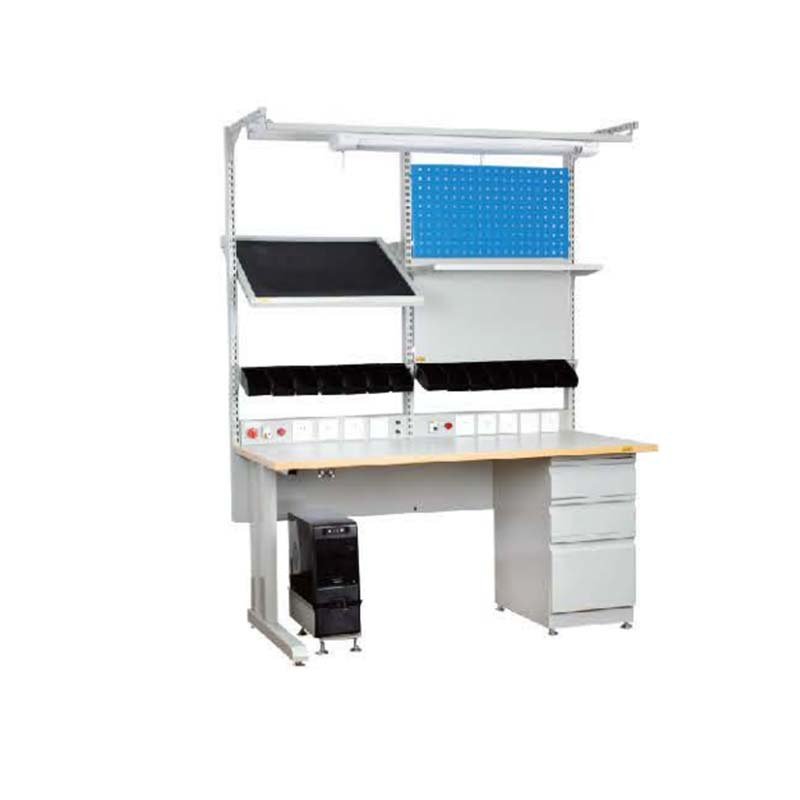
Step 1: Choose the Right Workbench or Table
The first step in learning how to build an ESD workstation is choosing the right workbench.
A workstation should be:
-
stable
-
large enough for the work
-
easy to clean
-
suitable for grounding accessories
-
compatible with an ESD table mat
A plain table can sometimes be upgraded with ESD components, but in production environments, a dedicated ESD workbench is usually better because it is designed to support grounding, organization, and long-term use.
When choosing a workbench, think about:
-
work surface size
-
weight capacity
-
cable management
-
lighting placement
-
shelf options
-
compatibility with common point ground hardware
Step 2: Install an ESD Table Mat
The ESD table mat is one of the core parts of the workstation. It provides the primary static-controlled surface where sensitive electronics are handled.
A good ESD mat should:
-
be sized for the workstation
-
match the application
-
support grounding
-
resist wear from daily use
-
be suitable for electronics handling
For most electronics benches, a static dissipative mat is the preferred choice because it allows controlled discharge rather than overly fast charge movement.
Place the mat so it covers the main working area where boards, components, and tools will be handled.
ESD mat should not be treated as decoration. Its performance depends on proper installation and grounding.
Step 3: Connect the Mat to Ground
An ESD mat must be grounded properly to function as intended.
This usually involves:
-
a grounding cord
-
a common point ground
-
a verified grounding point
The grounding system creates a safe path for static electricity to move away from the surface.
A typical setup may involve:
-
connecting the mat snap to a grounding cord
-
connecting that cord to a common point ground or approved ground
-
attaching the wrist strap system to the same controlled grounding point
The goal is not random grounding. The goal is a proper, controlled path consistent with the workstation design.
Grounding is one of the most important parts of any ESD workstation setup. A workstation mat without grounding is incomplete.
Step 4: Add an ESD Wrist Strap System
A workstation protects components only if the operator is also grounded correctly.
That is why most bench setups include an ESD wrist strap.
The wrist strap should:
-
be worn on bare skin
-
fit snugly
-
connect through a grounding cord
-
be attached to the common point ground or approved workstation connection
-
be tested regularly
At seated electronics benches, wrist straps are one of the most reliable methods of personal grounding.
This is especially important when handling:
-
open PCB assemblies
-
ICs
-
test fixtures
-
exposed circuitry
-
unpackaged ESD-sensitive parts
The workstation should provide easy, organized connection points so the operator can use the wrist strap correctly every time.
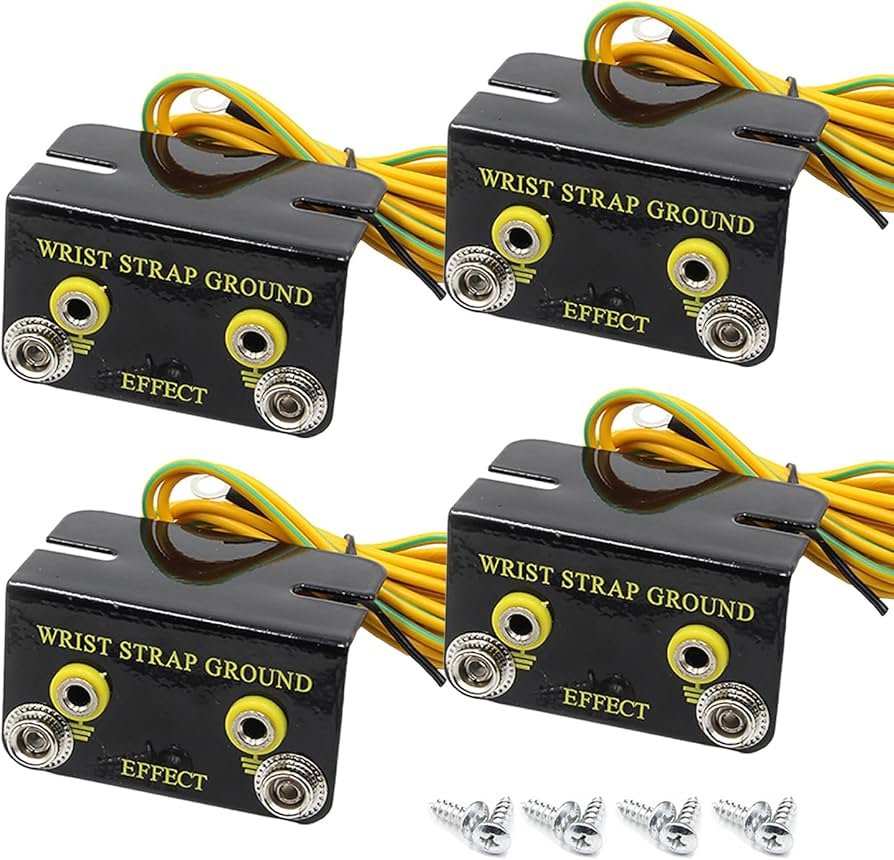
Step 5: Install a Common Point Ground
A common point ground is often used to connect multiple grounding elements in one place.
This may include:
-
ESD mat
-
wrist strap
-
additional accessories
Why is this useful?
Because it creates a more organized, repeatable grounding arrangement. Instead of using random grounding points or ad hoc connections, the workstation uses one clear grounding hub.
This improves:
-
operator consistency
-
setup clarity
-
maintenance
-
troubleshooting
A good common point ground layout makes the workstation easier to inspect and manage.
Step 6: Use ESD-Safe Seating
An ordinary chair can generate static electricity through movement, fabric friction, and rolling contact.
An ESD-safe chair is designed to reduce static generation and support grounding compatibility in controlled work areas.
When choosing seating, look for:
-
ESD-safe materials
-
proper casters or glides
-
compatibility with the work environment
-
durability for daily use
This part is often overlooked, but it matters. If the operator sits on a high-static chair and then handles sensitive components, the rest of the workstation may not be enough.
Step 7: Consider Flooring, Footwear, and Floor Mats
If the workstation is part of a larger ESD protected area, the floor may also need static control.
Depending on the environment, this may involve:
-
ESD flooring
-
ESD floor mats
-
heel grounders
-
ESD shoes
For seated bench work, the wrist strap is often the main personal grounding method.
For standing workstations or production areas, floor-based grounding becomes more important.
When planning how to build an ESD workstation, think beyond the tabletop. The operator’s entire movement path affects static control.
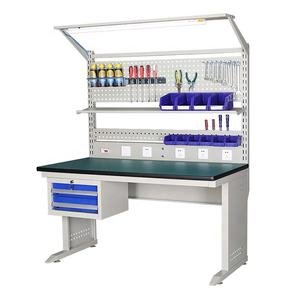
Step 8: Organize Tools and Storage
An ESD workstation should not contain random plastic containers or uncontrolled accessories if sensitive electronics are being handled.
Use ESD-safe items where needed, including:
-
bins
-
trays
-
parts storage boxes
-
tool holders
-
component containers
Keep the workstation organized so ESD-sensitive items are:
-
easy to identify
-
easy to access
-
not mixed with uncontrolled materials
A cluttered workstation increases handling mistakes and often introduces non-ESD-safe materials into the work area.
Step 9: Add Proper Lighting and Ergonomics
A good workstation is not only ESD-safe. It also needs to be usable.
Good lighting improves:
-
soldering quality
-
inspection accuracy
-
rework precision
-
operator comfort
Ergonomic setup reduces fatigue and helps operators maintain correct working habits.
Consider:
-
task lighting
-
magnification if needed
-
chair height
-
bench height
-
arm support
-
reach distance to tools and grounding points
An ESD workstation that is uncomfortable will not be used correctly for long.
Step 10: Decide Whether You Need an Ionizer
Grounding works very well for conductive and dissipative items, but it does not solve every static problem.
Some materials are difficult to ground, such as:
-
plastic packaging
-
films
-
trays
-
insulators
-
some component carriers
In these cases, an ionizing fan or ionizer may be needed.
You should consider ionization when:
-
insulators are present near the work
-
grounding alone is not enough
-
products are highly ESD sensitive
-
packaging materials generate static
-
the workstation handles plastic-heavy components or carriers
Ionizers do not replace grounding. They complement it.
Do You Need an Ionizer in an ESD Workstation?
You may need an ionizer in an ESD workstation when insulating materials such as plastics, films, or trays are present and cannot be grounded effectively. Ionizers neutralize static charges in situations where grounding alone does not provide enough protection.
Step 11: Test and Verify the Setup
Once the workstation is assembled, it should be checked before use.
Important checks include:
-
wrist strap testing
-
grounding cord inspection
-
mat grounding verification
-
connector condition
-
workstation organization
-
absence of non-ESD-safe materials in the active area
Do not assume the setup is correct just because it looks professional. Verification matters.
Regular checks should also be part of the workstation routine.
Step 12: Train Operators on Correct Use
Even a perfectly designed workstation can fail if users do not understand how to use it.
Training should include:
-
how to wear the wrist strap
-
where to connect grounding cords
-
what materials should stay out of the area
-
how to test the wrist strap
-
when to use ionization
-
basic ESD handling rules
Many ESD failures happen because systems are installed but not used consistently.
Common Mistakes When Building an ESD Workstation
1. Using a Regular Mat Instead of an ESD Mat
Not every anti-static-looking mat is a true ESD mat.
2. Skipping Grounding
A mat without grounding is not a complete workstation solution.
3. Ignoring the Chair
Static-generating seating can undermine the workstation.
4. No Wrist Strap Testing
An untested wrist strap may give false confidence.
5. Using Random Plastic Bins
Ordinary plastics can generate or hold charge.
6. Forgetting About Insulators
Grounding does not solve every static problem.
7. Poor Cable Organization
Messy cords lead to misuse and damage.
8. Treating the Workstation as a One-Time Purchase
ESD control needs maintenance, not just installation.
ESD Workstation Checklist
A basic workstation checklist may include:
-
ESD-safe workbench
-
ESD table mat
-
grounding cord
-
common point ground
-
ESD wrist strap
-
wrist strap tester
-
ESD-safe chair
-
ESD-safe storage bins
-
proper lighting
-
ionizer if needed
-
clear work rules
-
routine maintenance plan
This checklist is a good starting point for most electronics environments.
People Also Ask About Building an ESD Workstation
What do I need for an ESD workstation?
You usually need an ESD mat, grounding cord, wrist strap, common point ground, and a suitable workbench. Depending on the application, you may also need ESD seating, storage, flooring, and an ionizer.
How do you ground an ESD workstation?
An ESD workstation is usually grounded through the mat grounding cord and common point ground, with the operator connected through a wrist strap system.
Do I need a wrist strap if I already have an ESD mat?
Yes. The mat protects the work surface, while the wrist strap grounds the operator. Both are important in electronics handling.
Can I use a regular desk as an ESD workstation?
A regular desk can sometimes be upgraded with an ESD mat and grounding system, but a dedicated ESD workbench is usually more reliable and easier to manage.
When do I need an ionizer at an ESD workstation?
You may need an ionizer when the work involves insulating materials that cannot be grounded effectively.
How to Build an ESD Workstation for Different Applications
Electronics Repair Bench
Focus on:
-
ESD table mat
-
wrist strap
-
tester
-
lighting
-
organized tools
-
small-parts bins
PCB Assembly Station
Focus on:
-
dissipative mat
-
common point ground
-
wrist strap system
-
component-safe storage
-
controlled handling area
Cleanroom or Sensitive Production Work
May require:
-
cleanroom-compatible ESD materials
-
specialized seating
-
ionization
-
tighter process control
Industrial Test Bench
May require:
-
larger work surface
-
cable control
-
grounding organization
-
equipment-safe arrangement
The best workstation depends on the process, not just the product list.
Best Practices for Maintaining an ESD Workstation
Once the workstation is built, maintain it properly.
Good maintenance includes:
-
cleaning mats with suitable cleaners
-
inspecting grounding cords
-
testing wrist straps regularly
-
replacing worn bands and cords
-
keeping the workspace organized
-
reviewing process compliance
-
checking ionizer maintenance if installed
An ESD workstation is a working system. It performs best when maintained consistently.
Build a Reliable ESD Workstation for Electronics Manufacturing
Whether you are setting up a repair bench, PCB assembly area, or full ESD protected workstation, choosing the right components matters. Explore professional ESD mats, wrist straps, grounding accessories, ionizing fans, and workstation products designed for static-sensitive environments.
Shop ESD Workstation Products
Request Bulk Quote
Ask for Setup Recommendations
📞 Contact Us Today
For bulk orders, quotes, or product guidance, get in touch with our expert team:
Email: sales2@esdbest.com
Phone: +86 137 1427 2599
Conclusion
Learning how to build an ESD workstation is really about building a complete static-control system, not just buying one or two accessories.
A proper workstation includes:
-
the right workbench
-
an ESD mat
-
proper grounding
-
a wrist strap system
-
common point ground
-
ESD-safe seating and storage
-
ionization when needed
-
regular testing and training
When these elements work together, the workstation becomes a practical defense against electrostatic discharge and helps protect sensitive electronics during assembly, repair, inspection, and testing.
For most electronics environments, the goal is simple: create a clean, grounded, organized, and repeatable workspace where both the operator and the product remain protected.
FAQ
1. What is an ESD workstation?
An ESD workstation is a static-controlled work area designed to protect sensitive electronic components from electrostatic discharge.
2. What equipment is needed for an ESD workstation?
Typical equipment includes an ESD mat, grounding cord, wrist strap, common point ground, and suitable workstation accessories.
3. Do I need a wrist strap if I already have an ESD mat?
Yes. The mat protects the work surface, while the wrist strap grounds the operator.
4. How do you ground an ESD workstation?
You usually ground the workstation through the mat grounding cord and a common point ground system.
5. Can I use a regular desk as an ESD workstation?
You can upgrade a regular desk, but a dedicated ESD workbench is usually better.
6. What type of mat should I use on an ESD workstation?
For most electronics benches, a static dissipative ESD mat is the preferred choice.
7. Do ESD workstations need special chairs?
ESD-safe seating is recommended because ordinary chairs can generate static.
8. When do I need an ionizer at an ESD workstation?
When insulating materials are present and grounding alone is not enough.
9. Are ESD floor mats necessary?
They may be necessary in some environments, especially for standing workstations or larger ESD areas.
10. What is a common point ground?
It is a grounding hub that connects multiple ESD devices, such as the mat and wrist strap, to one controlled ground point.
11. How often should an ESD workstation be checked?
The setup should be checked regularly, and wrist straps are often tested daily.
12. Can I use ordinary plastic bins at an ESD bench?
It is better to use ESD-safe storage if sensitive electronics are handled.
13. Is an anti-static mat the same as an ESD mat?
Not always. ESD mats are designed to work as part of a grounding system for electronics protection.
14. What is the most important part of an ESD workstation?
There is no single most important part, but proper grounding and operator grounding are essential.
15. Why is workstation organization important for ESD control?
Because clutter, uncontrolled materials, and poor layout increase handling mistakes and static risk.
🛒 Shop ESD Products →
https://esdbest.com/product/
📞 Contact Us Today
For bulk orders, quotes, or product guidance, get in touch with our expert team:
Email: sales2@esdbest.com
Phone: +86 137 1427 2599